Why Vanilla Meringue Cookies?
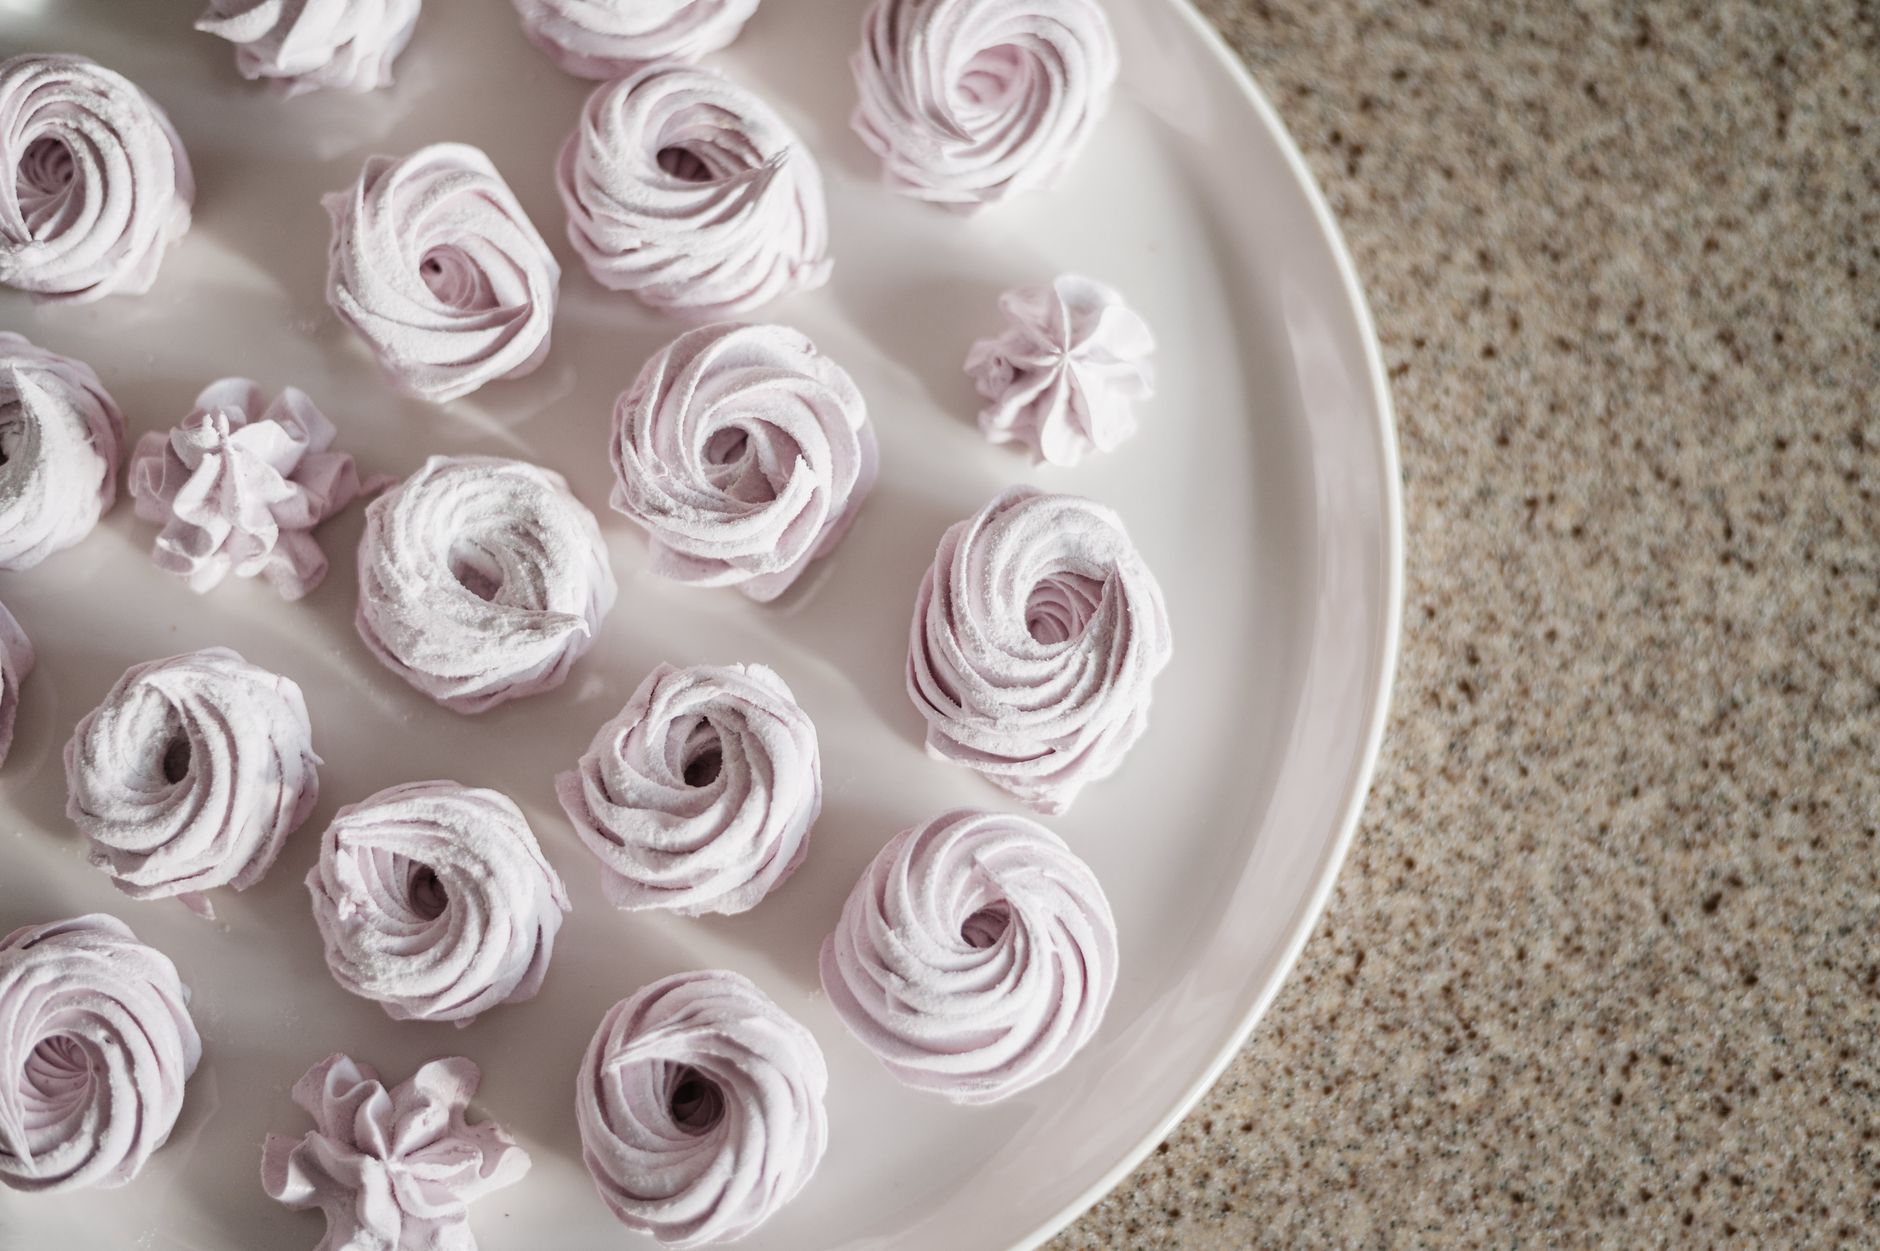
These cookies are feather-light, delicately crisp, and sweetly fragrant with vanilla. They crackle softly when you bite them, then dissolve almost like spun sugar.
Vanilla Meringue Cookies are made by whipping egg whites with sugar, vanilla, and cream of tartar until glossy and firm. The mixture is piped into small shapes, baked gently at 200°F, then left in the warm oven to dry. The result is a crisp, airy cookie with a clean vanilla flavor.
I make these when I want a simple dessert that looks special without requiring pastry dough or complicated decoration. They need only four ingredients, but clean equipment and patient mixing make a noticeable difference.

Health Benefits & Nutrition
These cookies are a small dessert rather than a nutrient-dense food, but their simple ingredient list makes their characteristics easy to understand.
- Very little fat: Traditional meringue contains egg whites, sugar, vanilla, and cream of tartar, with no butter or oil.
- Some protein from egg whites: Egg whites provide a modest amount of protein, although one small cookie contains only a little.
- No dairy in the basic recipe: The standard ingredients do not include milk, butter, or cream. Check your vanilla and any decorations if you need to avoid dairy carefully.
- Small portions: The cookies are naturally light, so a batch can provide individual servings for a dessert table or afternoon treat.
Because the main sweetener is granulated sugar, these cookies are still a sugary dessert. The approximate nutrition per cookie is 27 calories, 6 grams of carbohydrates, and 6 grams of sugar, although the numbers vary with cookie size and the exact ingredients used.
Egg whites can cause an allergic reaction in people with egg allergies. Anyone with a medically diagnosed allergy, a condition requiring sugar restriction, or another dietary concern should rely on advice from a qualified doctor or dietitian.
Ingredients & Preparation
Recipe Card
| Prep time | Cook time | Total time | Servings | Calories (approx) | Diet tags |
|---|---|---|---|---|---|
| 15 minutes | 75 minutes | 1 hour 30 minutes | 24 cookies | 27 per cookie | Vegetarian, dairy-free, gluten-free |
Ingredients
- 3 large egg whites, at room temperature
- 1/2 teaspoon vanilla extract
- 1/8 teaspoon cream of tartar
- 3/4 cup granulated sugar
For the cleanest result, separate the eggs while they are cold, then let the whites stand at room temperature for about 20 to 30 minutes. Cold eggs separate more easily, while room-temperature whites generally whip more readily.
Equipment needed
- Stand mixer with a whisk attachment, or a large bowl and electric hand mixer
- Two baking sheets
- Parchment paper
- Large pastry bag
- Large star piping tip
- Measuring cups and spoons
- Rubber spatula
A stand mixer leaves both hands free while you add the sugar gradually, but a hand mixer works well too. If you use a hand mixer, choose a deep bowl to reduce splashing during the early foamy stage.
Tips for choosing quality ingredients
Use fresh, clean egg whites. Older whites sometimes whip well, but fresh eggs give me a more stable, fuller foam. Avoid cartons of liquid egg whites unless the label specifically says they are suitable for whipping; many do not reach the same volume.
Choose fine-grained white sugar when possible. Standard granulated sugar works, but very coarse crystals may take longer to dissolve. Pure vanilla extract gives the clearest flavor, while imitation vanilla is usable if that is what you have.
Cream of tartar helps stabilize the whipped whites. It is used in a very small amount, so do not substitute baking powder or baking soda. Those ingredients change the flavor and are not suitable replacements here.

Step-by-Step Instructions
1. Heat the oven and prepare the trays
Preheat the oven to 200°F. Line two baking sheets with parchment paper, making sure the paper lies flat. Set the trays aside while you prepare the meringue.
Do not grease the parchment. A greasy surface can prevent the mixture from gripping the paper, which may cause piped shapes to spread. I also avoid silicone mats for this particular batch because the cookies sometimes need a few extra minutes to dry on them.
2. Whip the egg whites until foamy
Add the room-temperature egg whites, vanilla extract, and cream of tartar to a stand mixer fitted with a whisk attachment. Beat on medium speed for about 2 minutes, or until the whites look evenly foamy and soft peaks begin to form.
At this point, the mixture should look white and bubbly rather than glossy. The whisk should leave soft trails that slowly disappear. If any yolk has slipped into the bowl, the whites may not whip properly, so start again with a clean bowl if necessary.
3. Add the sugar gradually
Keep the mixer on medium speed and add the granulated sugar 1 tablespoon at a time. Wait approximately 15 seconds between additions. Once all the sugar is in the bowl, continue beating for 5 minutes.
The finished mixture should be bright white, glossy, and firm. Lift the whisk: the peak should stand upright with only a slight bend at the tip. Rub a little meringue between clean fingers. If it feels gritty, beat for another 1 to 2 minutes so the sugar has more time to dissolve.
The first time I made these, I added the sugar too quickly and the foam became loose instead of thick. Adding small spoonfuls slowly is the easiest fix and gives the meringue a smoother finish.
4. Pipe the cookies
Transfer the meringue to a large pastry bag fitted with a large star tip. Pipe 2-inch cookies onto the prepared trays, leaving about 1 inch between each one.
Hold the bag upright, squeeze steadily, and stop pressure before lifting the tip. This leaves a cleaner peak. If the mixture spreads as soon as it is piped, it was probably under-whipped or the sugar was not fully incorporated.
5. Bake and dry the meringues
Bake the trays at 200°F for 45 minutes. Turn off the oven without opening the door, then leave the cookies inside for 30 minutes.
When they are ready, the cookies should feel dry on the outside and lift from the parchment without sticking. Their color should remain pale cream or white. A faint crackle as you gently tap one is a useful cue that the surface has dried.
Remove the trays and cool the cookies completely before storing them. If the centers still feel tacky after cooling, return them to a 200°F oven for 10 to 15 minutes, then let them dry again with the oven turned off.
Variations & Substitutions
- Lemon meringues: Replace half of the vanilla extract with 1/4 teaspoon finely grated lemon zest. Keep the total added flavoring small so the extra moisture does not weaken the foam.
- Almond-vanilla cookies: Use 1/4 teaspoon vanilla extract plus 1/4 teaspoon almond extract instead of 1/2 teaspoon vanilla. Almond extract is strong, so do not use equal amounts of both.
- Cocoa meringues: Fold 1 tablespoon unsweetened cocoa powder into the finished meringue with a rubber spatula. Sift the cocoa first and use gentle strokes to avoid deflating the whites.
- Mini meringues: Pipe 1-inch kisses instead of 2-inch cookies. Begin checking them after 35 minutes, then leave them in the switched-off oven for 20 to 30 minutes.
- Colored meringues: Add a tiny amount of gel food coloring after the sugar has dissolved. Gel works better than liquid coloring because it adds less moisture.
- No piping bag: Spoon rounded tablespoons onto parchment for a rustic shape. The cookies will not have ridges, but the texture will remain crisp and airy.
Do not replace the granulated sugar with liquid sweeteners such as honey or maple syrup. They add moisture and prevent the mixture from drying into a crisp cookie. Powdered sugar can work in some meringue recipes, but it may contain cornstarch and gives these cookies a slightly different texture.
Storage & Shelf Life
Store completely cooled cookies in an airtight container at room temperature for up to 7 days. Layer them between sheets of parchment if the container is deep. Keep the container away from steam, sunlight, and humid areas of the kitchen.
Refrigeration is usually not the best choice because refrigerator humidity can soften the shells. If refrigeration is necessary, store the cookies in an airtight container for up to 3 days and allow them to return to room temperature before serving.
For longer storage, freeze the cooled cookies in a rigid airtight container for up to 1 month. Place parchment between the layers, freeze them without crushing the delicate shapes, and thaw them inside the closed container. Keeping the container closed while they thaw helps condensation form on the container rather than on the cookies.
Discard the cookies if they develop visible mold, an unusual odor, wet patches that do not dry, or a sticky texture caused by prolonged moisture exposure. A little cracking is normal and does not mean the cookies have spoiled.
Pro Tips
Keep every tool grease-free. Wash the bowl, whisk, and spatula with hot soapy water, then dry them thoroughly. Even a small amount of butter or egg yolk can interfere with the foam.
Use a glass or metal bowl when possible. Plastic can hold traces of grease even after washing. A clean stainless-steel bowl gives the whites plenty of room to expand.
Do not rush the sugar. The sugar needs time to dissolve into the egg-white foam. Adding it one tablespoon at a time creates a finer, glossier meringue and reduces gritty pockets.
Watch the weather. Damp air can make the cookies sticky even after the full baking time. On humid days, extend the drying period by 10 to 20 minutes rather than raising the temperature.
Keep vanilla restrained. Too much liquid flavoring can loosen the mixture. The 1/2 teaspoon amount gives a noticeable aroma without compromising the structure.
Use parchment for clean release. Avoid waxed paper, which is not designed for oven heat. If the cookies stick slightly, let them cool fully before trying again; warm meringue is more fragile.
Do not brown the shells. Meringues should dry slowly rather than bake like a conventional cookie. If the edges begin turning beige, check that your oven is actually holding close to 200°F.

Questions & Answers
When is the best time to eat Vanilla Meringue Cookies?
The best time to eat Vanilla Meringue Cookies is after they have cooled completely, usually within a few hours of baking. They have their crispest texture when freshly dried and kept away from humidity. Serve them with coffee, tea, fruit, ice cream, or as a light dessert after dinner.
Why are my meringue cookies sticky?
Sticky meringue cookies usually absorbed moisture from the air or were not dried long enough. Humid weather is the most common cause. Return them to a 200°F oven for 10 to 15 minutes, switch the oven off, and let them cool inside. Store them immediately in an airtight container.
Can I make these cookies without cream of tartar?
Yes, you can make them without cream of tartar, but the whipped whites may be slightly less stable. Use 1/2 teaspoon lemon juice as an alternative, adding it with the vanilla. The flavor may have a faint citrus note, so cream of tartar is preferable when you want the cleanest vanilla taste.
How can I tell when meringue is stiff enough?
The meringue is stiff enough when it looks glossy and the whisk leaves a peak that stands upright. It should not look watery, dull, or grainy. Rub a little between your fingers; the mixture should feel mostly smooth. If it feels sandy, continue mixing for another minute or two.
Can I use a hand mixer instead of a stand mixer?
Yes, a hand mixer works well for this recipe. Use a large, deep, grease-free bowl and beat the whites on medium speed. Add the sugar gradually while continuing to mix. The process may take a little longer because hand mixers vary in power, so rely on the glossy, firm texture rather than the clock alone.
Why did my meringues crack in the oven?
Meringues can crack when the oven temperature is too high, the shells dry too quickly, or the mixture contains undissolved sugar. Small cracks are harmless and still taste good. Use a low 200°F oven, add sugar slowly, and let the cookies cool gradually inside the switched-off oven.
Can I pipe these into different shapes?
Yes, you can pipe kisses, rosettes, nests, or small discs with different pastry tips. Keep the pieces close in size so they finish drying at the same time. Larger shapes may need an additional 10 to 20 minutes in the warm oven after baking.
More Recipes You Will Love
If you enjoy light, sweet treats with a homemade texture, try this Apple fritters recipe 2107218. The tender apple centers and crisp edges make a satisfying contrast to these airy cookies.
For a richer dessert, the Ultimate chocolate peanut butter pie 18052977 brings together a creamy filling, chocolate flavor, and a substantial crumb crust. It is a good choice when you want something more indulgent.
Conclusion
Vanilla Meringue Cookies turn a few everyday ingredients into crisp, delicate treats with a lovely vanilla aroma. The key is patience: add the sugar slowly, whip until the mixture is glossy, and let the cookies dry gently in the warm oven. Keep them protected from humidity, and they will stay light and crunchy. If you make a batch, leave a comment or rating and share which variation you tried.
FAQs
When is the best time to eat Vanilla Meringue Cookies?
The best time to eat Vanilla Meringue Cookies is as a light dessert after a meal or with afternoon tea, when they are at their freshest. They are best eaten within a day or two of baking, because they gradually soften as they absorb moisture from the air. Serving them with fresh fruit or coffee balances their sweetness.
How do I store Vanilla Meringue Cookies so they stay crisp?
Store Vanilla Meringue Cookies in a completely cool, airtight container at room temperature, with parchment between any layers. Keep the container away from humidity, since moisture makes meringue soft and sticky. Avoid refrigerating them, because condensation can ruin their texture. Stored properly, they keep their crispness for several days.
Can I use liquid egg whites instead of fresh egg whites in meringue cookies?
Liquid egg whites can work only if the carton is labeled suitable for whipping, and even then they often do not reach the same volume. Fresh egg whites produce a fuller, more stable foam, which gives crisper and airier cookies. If you use a carton, check that the whites form stiff peaks before adding sugar.
Why are my meringue cookies sticky or chewy instead of crisp?
Meringue cookies usually turn sticky or chewy because they were underbaked or exposed to humid air. Bake them low at 200°F, then leave them in the warm oven to dry out completely. Also make sure no yolk or grease reaches the whites, since fat prevents the foam from whipping firm.
Are Vanilla Meringue Cookies safe for people with egg allergies?
No, Vanilla Meringue Cookies are not safe for people with egg allergies. They are made mainly from egg whites and can trigger an allergic reaction. Anyone with a diagnosed egg allergy should avoid them and speak with a qualified doctor or allergist about safe options and any other dietary concerns.