Introduction
Why a Dutch Oven Recipe Book Elevates Your Baking Skills
The magic of cast iron comes alive when you bake in a dutch oven. The even heat baking benefits create golden crusts and tender interiors like no other cookware. A dutch oven recipe book guides you through smart techniques to avoid common dutch oven baking problems such as uneven cooking or burnt edges. It reveals how to unlock the full potential of your cast iron, elevating your bread baking in dutch oven projects to new heights.
Who This Recipe Book Is For: Novice to Experienced Bakers
Whether you‘ve never tried no-knead dutch oven bread or youre an artisan baker mastering complex casseroles, this recipe book suits you. It welcomes cooks of all skill levels and adapts to various dietary needs. If you want reliable results with traditional cookware, this resource will serve you well and inspire confidence.
What Sets This Dutch Oven Recipe Book Apart From Others
Unlike generic cookbooks, this selection focuses deeply on troubleshooting and cast iron baking tips. Recipes are backed by clear explanations and practical advice. Youll understand why some bakes succeed while others struggle, making your journey smoother and more enjoyable.
Key Highlights
Even Heat Distribution for Superior Texture
Dutch ovens have thick walls and tight lids that trap steam perfectly. This creates consistent heat circulation around your dough or casserole. The result? Crispy crusts with a tender, moist crumb insidesomething ordinary bakeware can seldom match. This benefit also extends to casseroles and other dishes, preserving flavors beautifully.
Versatility Across Recipes and Diet Preferences
From classic bread to best dutch oven recipes for gluten-free dutch oven recipes, your cast iron pot handles a wide range. It works wonders for casseroles, stews, and even desserts, adapting easily to whatever you love.
Caution for New Users: Handling and Heat Management
Cast iron is heavy and retains intense heat. Take care when moving hot cookware to prevent injury. Avoid sudden temperature changes that could crack your dutch oven. Mastering heat control ensures perfect results and safe baking.
Ingredients & Preparation
| Prep time | Total time | Servings | Calories | Diet tags |
|---|---|---|---|---|
| 15 minutes | 60 minutes | 6 | 280 per serving | Gluten-Free option available |
Complete Ingredient List with Substitutions
- 3 cups bread flour (substitute gluten-free flour blend for gluten-free dutch oven recipes)
- 2 tsp active dry yeast or 1 packet
- 1 tsp salt
- 1 cups warm water (about 110F)
- Optional: 1 tbsp honey or sugar for sweetness
- For sourdough variant: Replace yeast with cup active sourdough starter
Equipment Needed: Choosing the Right Dutch Oven
Decide between enameled or traditional cast iron based on your preference. Enameled models don‘t require seasoning and resist rust, but traditional cast iron develops rich seasoning layers enhancing flavors. Size matters: opt for a 5 to 6-quart dutch oven for optimal baking space. Always use a tight-fitting lid to trap steam for crusty bread baking.
Selecting Quality Ingredients for Best Results
Choose fresh yeast for subtle flavor; dry yeast works well and lasts longer. Organic or stone-ground flour often adds depth to taste. Fresh ingredients contribute directly to the aroma and texture of your bread baking in dutch oven sessions.
Step-by-Step Instructions
Step 1 Prep Ingredients: Measure, sift, and proof yeast precisely
Accurate measuring is crucial. Combine flour and salt in a bowl. In warm water (110F), dissolve yeast and optional honey. Let prove 5 minutes until frothy. Precise timing prevents dense dough and encourages even rise. Sift flour if clumpy for a smoother texture.
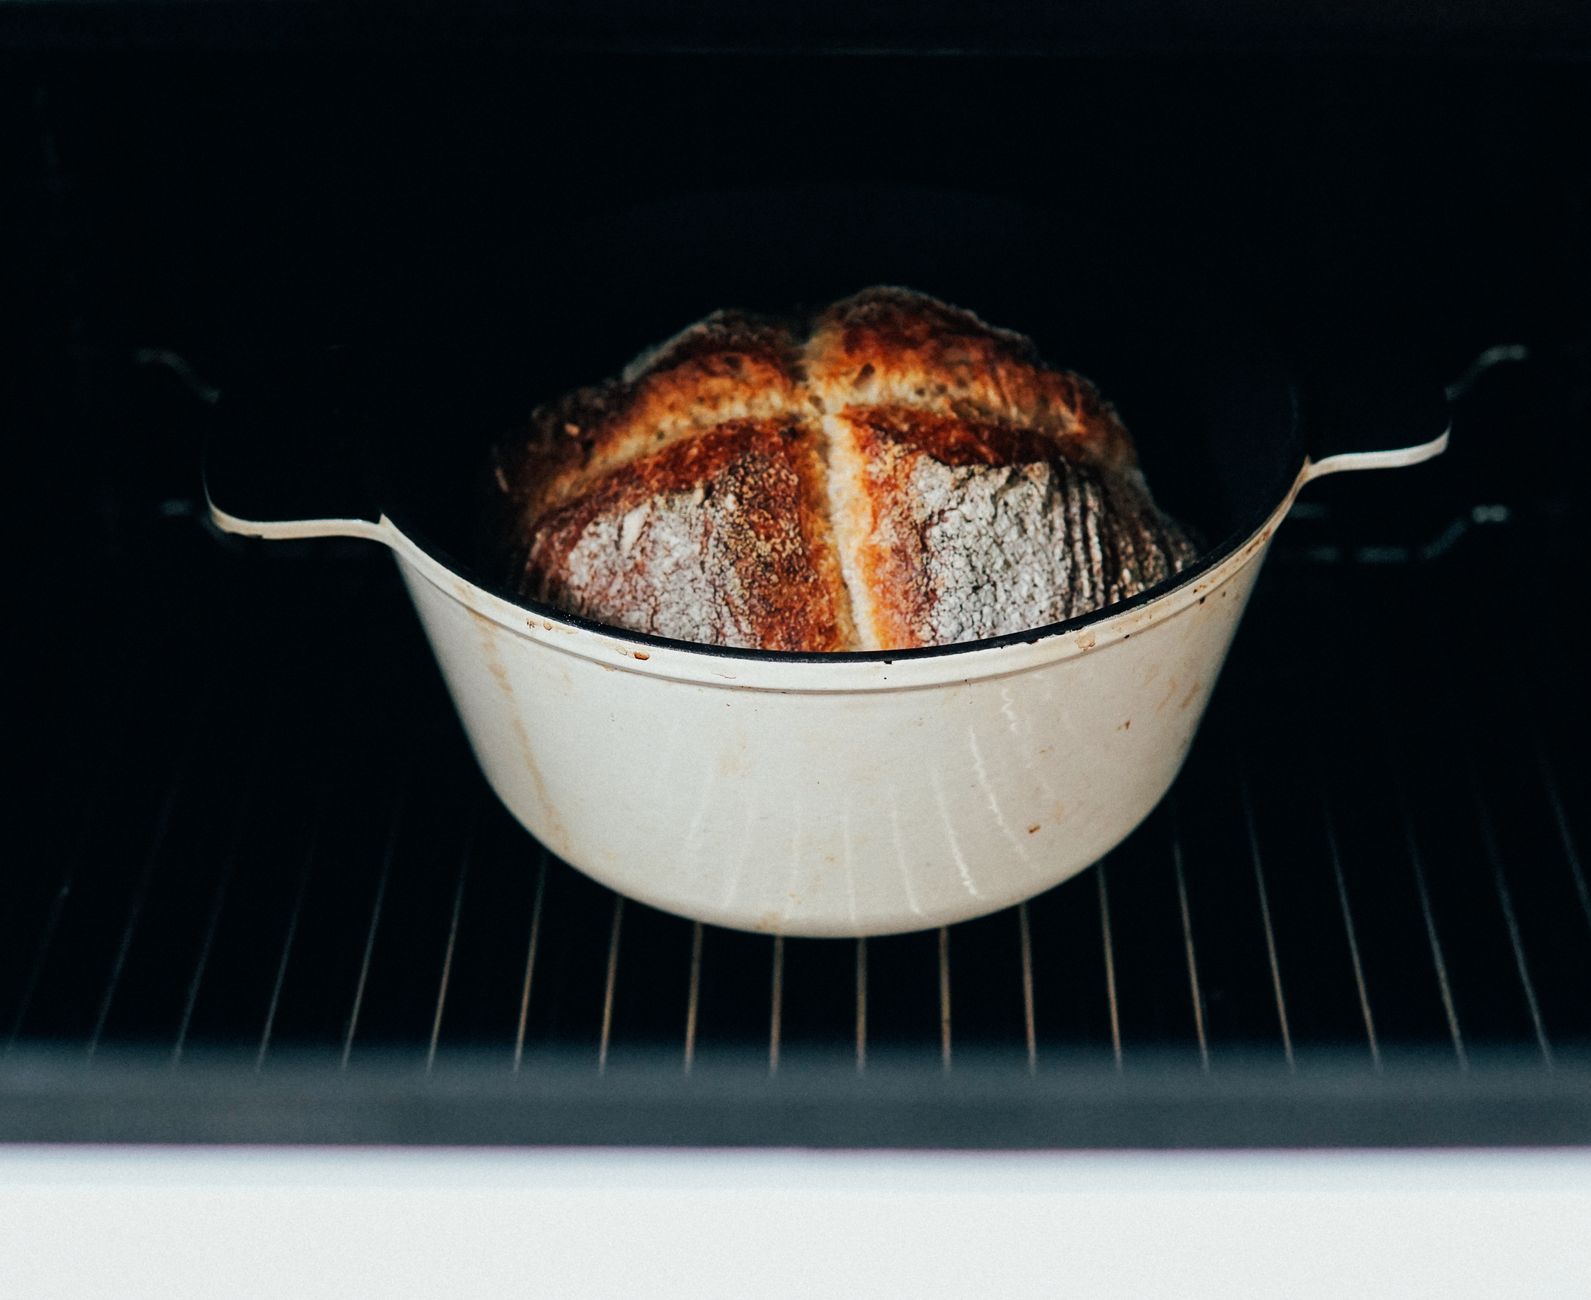
Step 2 Main Process: Mix dough, knead gently, then bake at 450F for 30 minutes covered, then 15 minutes uncovered
Slowly stir the yeast water into flour until just combined. Knead softly for 5 minutes on a lightly floured surface. Shape into a ball and place in a greased bowl; cover with a damp cloth. Let rise 45 minutes at room temperature until doubled in size.
Preheat oven to 450F. Place dutch oven inside to heat for 30 minutes. Place dough on parchment, lower into hot pot and cover. Bake 30 minutes covered to trap steam, then remove lid. Bake 15 minutes uncovered for a golden crust.
Step 3 Strain and Finish: Optional egg wash or seed topping post initial bake
If desired, apply an egg wash or sprinkle seeds immediately after removing the lid, then bake uncovered. This adds a shiny, flavorful crust that crunches deliciously. Be gentle to avoid deflating your loaf.
Step 4 Serve or Store: Cool completely before slicing; store in breathable bags
Allow bread to cool for at least 1 hour on a wire rack. This prevents a gummy crumb. Store in paper or cloth bags to maintain crisp crust for 2 to 3 days. Avoid plastic bags as they trap moisture and soften crust.
Variations & Substitutions
Gluten-Free Dutch Oven Bread Variation
Use a gluten-free flour blend matched with cup more hydration to replicate dough elasticity. Add 1 tsp xanthan gum if your blend lacks it. The baking time remains the same but expect a softer crumb. Perfect for those with gluten sensitivities.
Ingredient Swaps and Trade-Offs
Whole wheat flour adds nutty flavor but yields a denser rise. Milk instead of water tenderizes the crumb and adds richness but reduces the crusts crunch. Adjust yeast slightly if switching liquids, as milk slows fermentation.
Adjusting Flavor Strength and Sweetness
Incorporate fresh herbs or a drizzle of honey to fine-tune sweetness and aroma. Remember, subtlety highlights the natural flavour from bread baking in dutch oven better than overpowering additives.

Storage & Shelf Life
Refrigerator Storage
Store your bread in a paper bag inside the fridge for up to 3 days. This keeps the crust crunchy and crumb moist without excess condensation.
Freezer Option
Wrap bread tightly in foil then plastic wrap to prevent freezer burn. Freeze for up to 3 months. Thaw at room temperature overnight on a wire rack for best texture.
Make-Ahead Tips
Double the recipe to bake in batches. Store extra loaves airtight and labeled with date and contents. This saves time and keeps your pantry well stocked.
Pro Tips & Troubleshooting
Avoiding Stains and Getting Maximum Heat Efficiency
Clean your cast iron dutch oven after each use with warm water and brushskip soap to preserve seasoning. Dry thoroughly and lightly oil if needed. Preheat dutch oven in the oven for 30 minutes before baking. This builds a radiant heat environment that enhances crust formation.
Common Issues: Pale Crust or Dense Texture and Their Fixes
Pale crusts often occur from insufficient preheating or steam loss. Ensure your oven and pot reach full temperature. Dense bread usually points to under-proofing. Give your dough extra time in a warm spot to rise fully.
Expert Upgrade: Add a Small Tray of Water to Oven Base for Enhanced Steam
Placing a shallow pan of boiling water on the oven floor traps moisture during baking. This steam intensifies crust crispness and golden color, perfect for artisan no-knead dutch oven bread.
When is the best time to eat dutch oven bread?
The best time is freshly out of the ovenwhen the crust crackles and aroma fills the kitchen. Let it cool one hour to complete baking inside before slicing. Enjoy morning or afternoon for the freshest experience.
Can I make a big batch and store it?
Absolutely. Bake multiple loaves, freeze them wrapped tightly for up to 3 months, and thaw overnight at room temperature. This keeps bread fresh and ready for busy days.
Fresh yeast or dry yeastwhich works better in dutch oven baking?
Dry yeast is shelf-stable and easy to use. Fresh yeast offers nuanced flavor but must be handled carefully and stored properly. Both produce excellent results if proofed correctly.
Is dutch oven baking safe during pregnancy or for kids?
Yes, but exercise caution handling hot cookware. Use oven mitts and avoid sudden movements. For children, supervise closely or assist when removing the lid or handling heavy pots.
How often should I bake bread in a dutch oven?
As often as you wish. Cast iron tolerates frequent use well with proper care. Regular baking also improves seasoning and enhances flavors over time.
Why does my bread taste bitter?
Bitter flavors usually stem from over-fermentation or expired yeast. Check your ingredients‘ freshness and avoid letting dough rise too long at warm temperatures.
What pairs well with dutch oven baked bread?
Soups, creamy cheeses, and hearty stews highlight the crispy crumbs and rich flavors. Add homemade herb butter for bread rolls to complement and elevate every bite.
More Recipes You Will Love
No-Knead Bread for Beginners Baking Techniques
Try this simple no-knead recipe that delivers a beautiful crust with minimal effort. Its perfect to build your confidence before tackling intricate bakes.
Classic Beef Stew in a Dutch Oven Dinner Recipes
Discover how your dutch oven becomes a slow-cooking hero. This stew recipe blends tender meats and savory herbs for cozy dinners.
Winter Vegetable Casserole Holiday Recipes
Gather seasonal vegetables in your dutch oven for a warm, wholesome meal. The natural sweetness and earthiness are amplified by cast iron baking tips that preserve moisture.
Conclusion
A trustworthy dutch oven recipe book unlocks flawless baking results every time. It helps you sidestep common dutch oven baking problems while unleashing the full power of cast iron magic. Try these recipes and share your favorites or questions below. When ready, explore our best dutch oven recipes for even more inspiration.
FAQs
When is the best time to eat dutch oven bread?
The best time to eat dutch oven bread is freshly out of the oven when the crust crackles and the aroma fills the kitchen. Let it cool for about one hour before slicing to allow the interior to finish baking, ensuring the best texture and flavor.
Can I make a big batch of dutch oven bread and store it?
Yes, you can bake multiple loaves and store them. Freeze the loaves tightly wrapped in foil and plastic wrap for up to 3 months. To enjoy, thaw overnight at room temperature on a wire rack to preserve texture and freshness.
Which yeast is better for dutch oven baking: fresh or dry yeast?
Both fresh and dry yeast work well. Dry yeast is easier to store and use, offering consistent results. Fresh yeast provides a nuanced flavor but requires careful handling and storage. Proper proofing is key regardless of which you use.
Is dutch oven baking safe during pregnancy or for children?
Yes, dutch oven baking is safe during pregnancy and for children when proper precautions are taken. Use oven mitts to handle hot cookware and supervise children closely when handling or removing heavy pots to avoid burns or injuries.
Why does my dutch oven bread sometimes taste bitter?
Bitter flavors often result from over-fermentation or using expired yeast. Ensure your ingredients are fresh and avoid letting the dough rise too long or at excessively warm temperatures to prevent bitterness in your bread.