Introduction
Why Choose Old Fashioned Cast Iron Dutch Oven Recipes for Authentic Baking
Old fashioned cast iron dutch oven recipes invite you to enjoy the best of rustic cooking style. Baking with cast iron ensures even heat distribution, producing bread and dishes with rich flavor and delightful texture. These traditional methods, mastered over time, bring out the best in crusty bread benefits and slow baking methods for hearty meals. Using this cookware connects you with a time-honored baking heritage.
Who Benefits Most from These RecipesSkill Level and Lifestyle Considerations
Whether youre a seasoned baker or just starting, these recipes are approachable yet rewarding. They cater to those exploring gluten-free dutch oven recipes or anyone craving the deep flavors that cast iron dutch oven bread recipes consistently deliver. Busy folks and weekend chefs alike find joy in how dependable and versatile these dishes are.
What Sets This Collection ApartUnique Approach to Classic Baking
This collection highlights techniques to prevent common dutch oven baking mistakes like uneven crusts or dry interiors. Emphasizing proper heat control and moisture balance, it offers detailed instructions for replicating the rustic cooking style you love. These tried-and-true tips elevate each bake from simple to spectacular.
Key Features
Even Heat Distribution and Its Effect on Crust and Texture
Cast iron excels at holding steady, intense heat. This quality allows Dutch ovens to bake bread with a deep golden crust that crackles under the knife, locking in moisture for a tender crumb inside. Slow baking methods enhance flavor development and create that perfect crusty bread benefits so cherished.
Versatility: Cooking Beyond BreadStews and Casseroles
These ovens arent just for baking bread. Their thick walls and tight lids trap heat and steam, making them ideal for slow-cooked dishes like stews and casseroles. You can craft rustic meals bursting with hearty flavors, perfect for cozy dinners.
Safety Considerations When Using Heavy Cast Iron Cookware
Cast iron Dutch ovens are quite heavy and retain heat longer than other cookware. Handle them with oven mitts and always place on stable surfaces to prevent accidents. If you have wrist or hand limitations, consider using a Dutch oven with handles designed for a secure grip.
Ingredients & Preparation
| Prep time | Total time | Servings | Calories | Diet tags |
|---|---|---|---|---|
| 15 mins | 1 hr 15 mins | 6 | 280 | Gluten-Free, Vegetarian (variation) |
Exact Ingredients with Substitution Notes
- 3 cups bread flour (or gluten-free flour blend for GF option)
- 2 tsp active dry yeast (or instant yeast)
- 1 cups warm water (100110F)
- 1 tsp salt
- 1 tbsp olive oil (optional, for softer crust)
- Optional mix-ins: fresh herbs, seeds, dried fruits (adjust quantity as desired)
Substitute gluten-free flour with a recommended blend and slightly increase hydration. Whole wheat flour can replace bread flour for a denser loaf.
Equipment Needed
A well-seasoned cast iron Dutch oven with a tight-fitting lid is essential for consistent results. Oven-safe gloves, a mixing bowl, and a dough scraper will complete your toolkit.
Tips on Ingredient Quality
Choose high-protein bread flour for improved gluten development and elasticity. Fresh yeast produces a richer flavor, but dried yeast works well for convenience. Organic ingredients lend deeper, more complex aromas and textures to your baked goods.
Step-by-Step Instructions
Step 1 Prep Ingredients: Measure, Sift, Activate Yeast
Measure your flour accurately and sift to remove lumps. Warm the water to 100110F, then sprinkle the yeast on top and let it activate for 5 minutes until foamy. This signals the yeast is alive and ready.
Step 2 Dough Preparation: Mix, Knead, and First Rise
Combine the flour and salt in a bowl. Add yeast mixture and olive oil if using. Knead by hand or mixer for 10 minutes until the dough is smooth and elastic. Cover with a damp towel and let rise in a warm, draft-free spot for 45 minutes or until doubled in size.
Step 3 Shaping and Baking
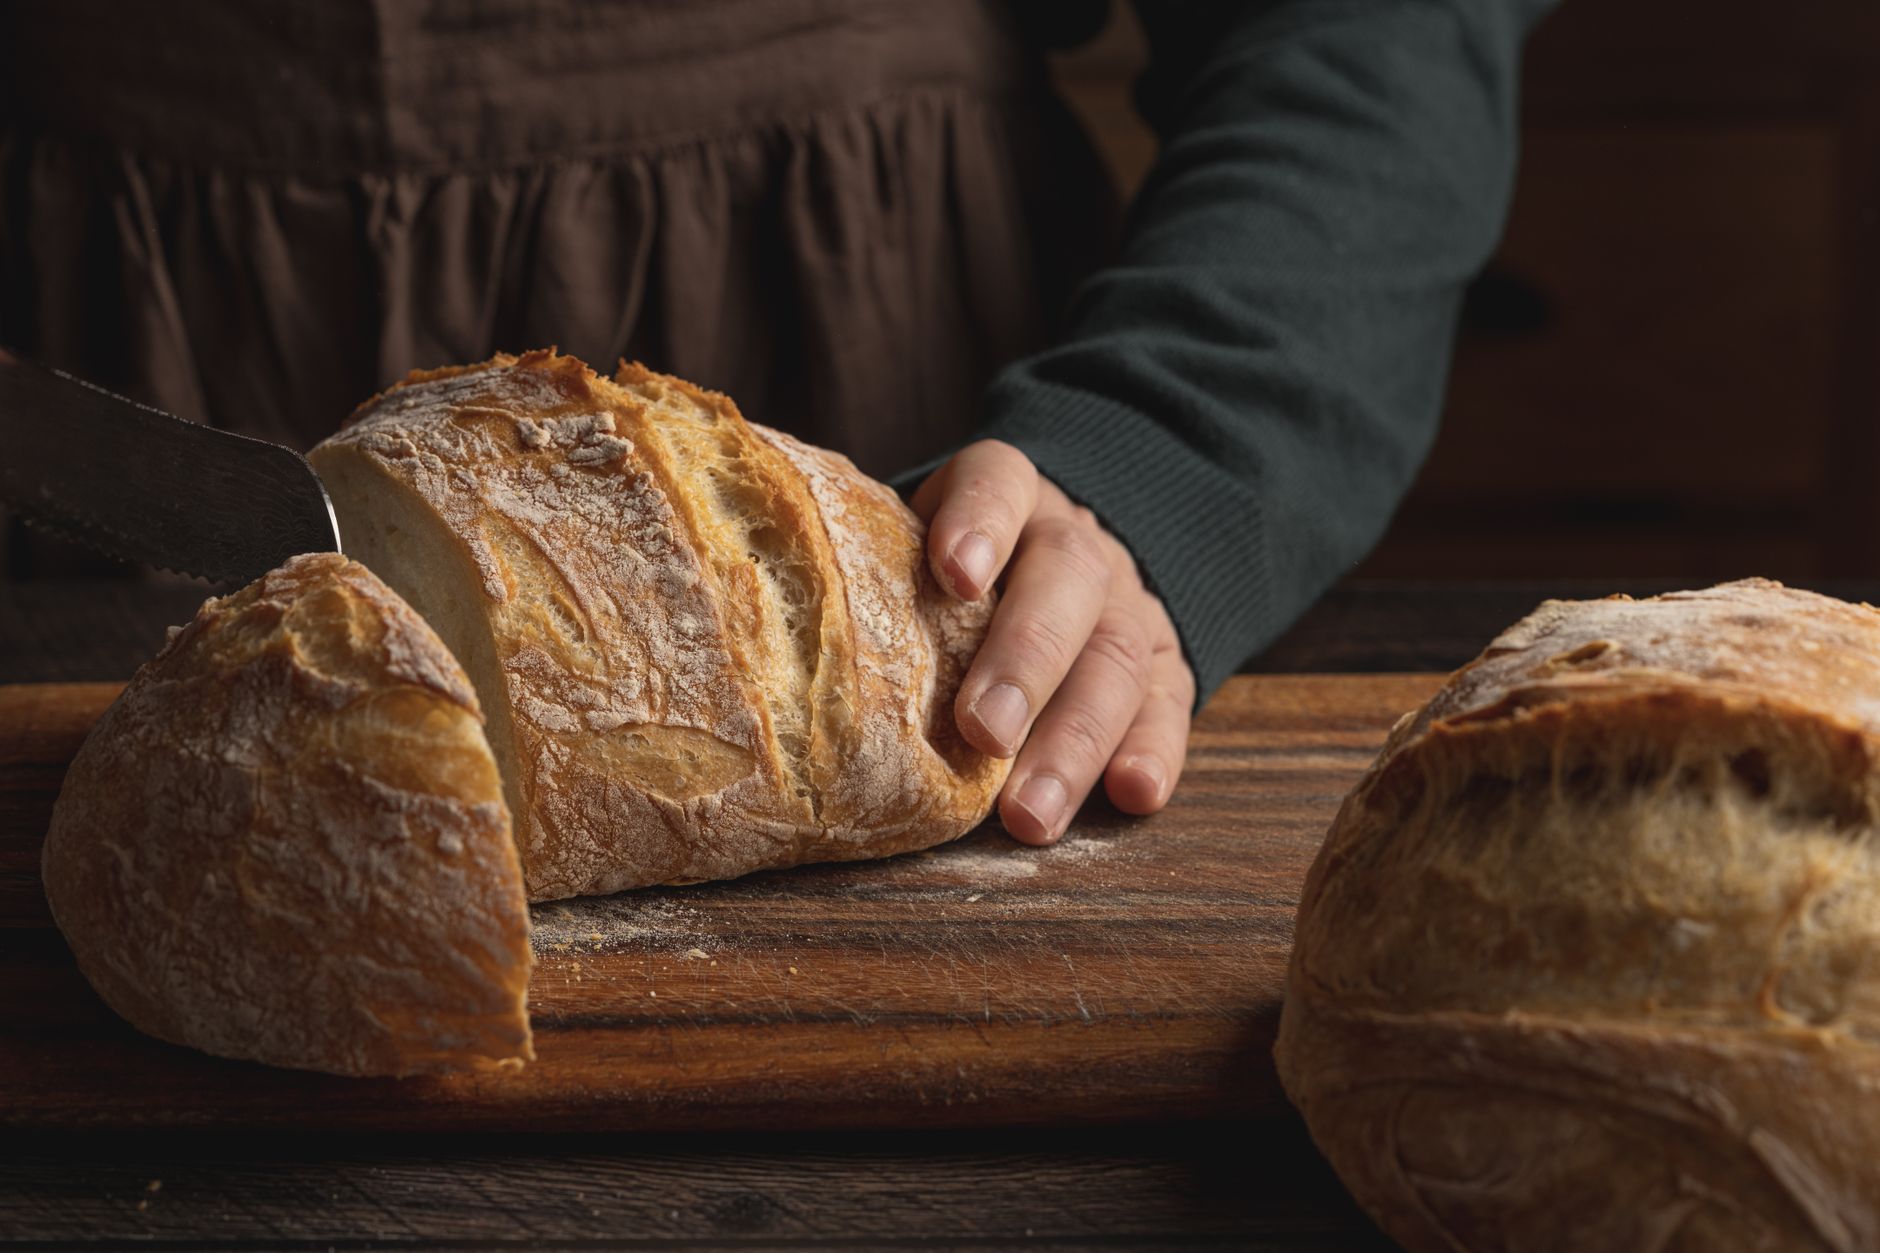
Preheat your cast iron Dutch oven in the oven at 450F for 30 minutes to ensure maximum heat retention. Shape the dough into a round loaf. Carefully place it into the hot Dutch oven, cover with the lid, and bake 30 minutes. Remove the lid and bake an additional 15 minutes to achieve a deep golden crust.
Step 4 Cooling and Serving
Use oven mitts to remove the Dutch oven from the oven. Transfer the bread to a wire rack and cool for at least 1 hour before slicing to let the crumb set properly. Store unused bread loosely wrapped at room temperature or freeze slices for longer storage.
One common mistake is opening the Dutch oven lid too soon. This causes steam to escape, resulting in a dull crust instead of that perfect crispy finish.

Variations & Substitutions
Flavor Variations
Add chopped rosemary and flaky sea salt for an earthy aroma, or incorporate cinnamon and raisins for a sweet breakfast loaf. These tweaks bring new personality without complicating the recipe.
Alternative Ingredients
Gluten-free dutch oven recipes need adjustments to hydration since GF flours absorb liquids differently. Use the gluten-free flour blend suggested on packaging. Whole wheat flour creates a denser crumb but adds hearty flavor and nutrition.
Adjusting Crust and Flavor Intensity
For a softer crust, reduce the uncovered baking time by 57 minutes. To enhance crust crunch, add a small pan of hot water in the oven during baking this extra steam helps achieve that signature crusty bread benefits.

Storage & Shelf Life
Refrigerator Storage
Store bread in a bread box or loosely wrapped with a cotton cloth at room temperature for 34 days. Avoid refrigeration as it dries out the crust and crumb faster.
Freezer Storage
Slice the bread and place slices in airtight bags. Freeze for up to 3 months. Thaw slices at room temperature before reheating.
Make-Ahead Tips
Double the recipe and bake multiple loaves at once. Store extras in freezer bags with date labels. Reheat slices in a 350F oven for 10 minutes to revive the crust and aroma.
Pro Tips & Troubleshooting
Avoid Flour Stains on Counters
Lightly oil your work surface before kneading to prevent dry dough sticking and spreading flour mess. Use a dough scraper to ease handling and keep counters tidy.
Fixing Off Results
Pale crust often means oven temperature is too low or preheating was insufficient. Bitter taste signals over-fermentation or excess salt. Adjust yeast, proofing times, or salt carefully next time.
Pro Upgrade
Place a small pan of hot water in the oven during baking to increase humidity. This steam elevates crust browning and texture by mimicking professional baking conditions, enhancing your rustic cooking style.

When is the best time to eat old fashioned cast iron dutch oven recipes?
Morning baking works beautifully since bread tastes freshest within hours of baking. Enjoy warm slices for breakfast or fresh bread with dinner for a satisfying rustic meal. Storing leftovers properly keeps flavors intact for several days.
Can I bake a large batch ahead of time and store it?
Absolutely. Baking double batches and freezing slices lets you enjoy fresh bread anytime. Wrap bread tightly in freezer-safe bags for up to 3 months, then thaw and reheat slices as needed.
Is fresh yeast or dried yeast better for Dutch oven baking?
Both types yield excellent results. Fresh yeast imparts a subtle, richer flavor but has shorter shelf life. Dried yeast offers convenience and stable performance, especially for beginners or occasional bakers.
Are these recipes safe for pregnant women or those with health conditions?
Generally, yes. They rely on wholesome, basic ingredients. Anyone with dietary restrictions should consult their healthcare provider to ensure these recipes fit their personal needs.
How often should I eat homemade Dutch oven bread?
Enjoying fresh homemade bread several times a week fits well within a balanced diet. Moderation is key to savoring the rustic flavors without excess calories or carbs.
Why does my bread taste bitter or have an odd crust color?
Bitter bread often comes from over-fermentation or too much salt. A pale crust typically means oven temperature was too low or steam was lacking. Adjust baking temperature and proofing time carefully to fix.
What dishes pair well with Dutch oven baked bread?
Hearty stews, savory soups, and creamy cheeses all complement rustic bread beautifully. These combinations enhance the cast iron dutch oven bread recipes experience with satisfying textures and flavors.
More Recipes You Will Love
Try the lodge dutch oven recipes for more ideas on hearty meals made with cast iron. You might also be curious about what to do with egg yolks, a handy guide that complements many Dutch oven dishes. For a savory dough twist, the traditional bierocks dough recipe offers a delicious variation perfect for stuffing your cast iron creations.
Conclusion
Old fashioned cast iron dutch oven recipes bring warmth and authenticity to your kitchen. The combination of even heat, moisture retention, and traditional slow baking methods creates crusty bread benefits and rustic meals youll savor again and again. Give this style a try and share your results below. Dont forget to explore the rustic no-knead bread recipe next for an easy cast iron baking adventure.
FAQs
When is the best time to eat old fashioned cast iron dutch oven recipes?
The best time is shortly after baking, ideally in the morning or at mealtime, when the bread is freshest and the crust is crispy. Enjoy warm slices for breakfast or alongside dinner for a satisfying rustic meal.
Can I bake a large batch ahead of time and store it?
Yes, you can double the recipe and freeze sliced bread in airtight bags for up to 3 months. Thaw slices at room temperature and reheat in the oven to restore freshness and crust.
Is fresh yeast or dried yeast better for Dutch oven baking?
Both work well. Fresh yeast adds richer flavor but has a shorter shelf life, while dried yeast is more convenient and stable, making it ideal for most bakers and occasions.
Are these recipes safe for pregnant women or those with health conditions?
Generally, yes. These recipes use wholesome ingredients suitable for most diets. However, individuals with specific health concerns should consult their healthcare provider before trying new recipes.
Why does my bread taste bitter or have an odd crust color?
Bitter flavor usually results from over-fermentation or too much salt. A pale crust often means the oven temperature was too low or steaming was insufficient. Adjust baking time, temperature, and ingredient amounts to fix these issues.